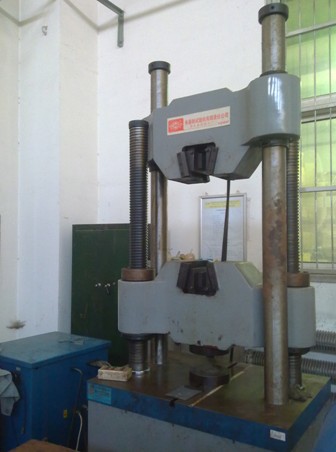
1000kN Stretcher
Name: Hydraulic servo universal material testing machine
Manufacturer: Changchun Kexin Experimental Instrument Co., Ltd.
Purchasing date: October, 2006
Main Specifications:
1. Maximum test force: 1000kN
2. Maximum distance of stretching chuck: 900
3. Maximum distance between upper and lower plate: 900
4. Maximum working piston stroke: 250mm
5. Rated pressure of the pump: 25mPa
6. Round specimen clamping range: Φ16 ~Φ52
7. Rectangular specimen clamping range: 16 ~ 54mm
Common accessories: round specimen jaw, flat specimen jaw
Main application area: metallic materials
Main functions: measuring tensile properties of metal material (R value and N value), elongation, section expansion rate, ultimate strength, yield limit, testing the performance of metallic materials
Person in charge: Zhao Wenzhu
Ways of contact:
Tel: 83688535; 13709840687
E-mail:
Location: factory of RAL
Instructions for tensile testing machine
Testing machines (stretcher for example) are used as follows:
- Power on the pump (green button), set the oil pressure gear to 1st gear; power on the computer, click on the "Servo test systems."
- Select “Stretch” option.
- Control the upper and lower chuck and beam height through operating the control box, which can only adjust the height of the sample. Clamp the sample carefully to prevent slipping.
- Click “Settings” in the “Servo test system”, select required samples (such as a circle, etc.) in “Sample types”, click “Parameter settings” to set sample types and initial value through “add record”(reduce record).
- Click “Print” and set “Report title of the test”, “Sample state”, etc. Finally, click “OK” to exit “Settings” program.
- Select the control mode according to the experimental needs. Select "Displacement control" and adjust value.
- Select the required curve type, such as "Force - displacement curve," "Force - time curve" and so on.
- Clear three parameters--"Force value", "Displacement", "Deformed". Test is ready to begin.
- Click "Start", "Load", and test begins.
- Observe the curve.
- The experiment ends when the sample is pulled off. Open the upper and lower chuck, remove the sample, and measure the diameter and gauge of the fractured sample by the operation box.
- Fill in the computer about the valid of sample, fractured diameter, fractured gauge, etc. Click “OK” and save them.
- Click "Curve revision" to repair. View and print test results and curves in the "Test report".
- Click "Start" and "Unload" to unload the test machine pressure to zero for the convenient of next experiment.
- Finally, click "File" and "Exit" to exit the system
- Power off the computer and oil pump (the red button), and adjust the oil pressure to 0 gear.