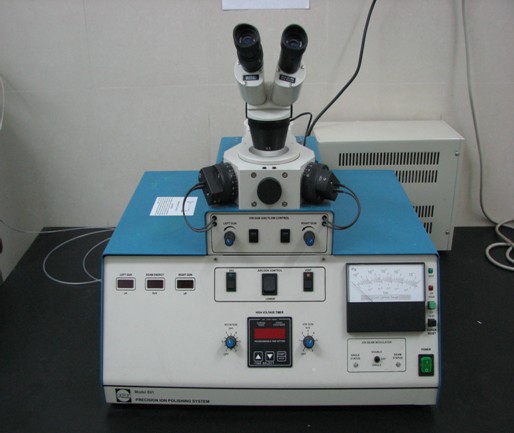
Ion Mill
Name: Ion Mill 691
Manufacturer: American GATAN Company
Purchasing date: April 4, 2008
Common accessories: Argon
Main application areas:
1. TEM sample preparation;
2. Thinning of metal and non-metallic materials;
Main functions:
1. Power supply: 220V (± 10%), 50Hz;
2. Operating temperature: 15-25 ° C; Humidity: <80%; the instrument can be used continuously;
3. Two ion guns, thinning incidence angle: -10 ° to 10 °
4. The temperature of sample heating stage can be controlled.
Person in charge of the equipment: Zhang Weina
Ways of contact:
Tel: 13604028597 024-83686411
E-mail:
Location: Room 131, RAL
Basic Operation Norms
- Before operation, make sure the Ar gas cylinder is not empty.
- Slice exchange:
- Fix the slice by Duo Post, and adjust the interface to be cut to the center.
- Press ’Vent’ button to open the upper cover of sample chamber.
- Use hook-type tweezers to put Duo Post into chamber, and then close the chamber.
- Press ‘Vac’ till the Vac light is on—sample chamber is in vacuum state.
- Turn ‘Air Lock Contron’ to ‘Lower’, and lower the slice to polishing area (Rotation cannot be at ‘OFF’ position, or Airlock won’t be lowered down);
- Polishing and observation
- Set voltage of ion gun (voltage for Si slice is around 4~5KV)
- Set Ion beam modulator at ‘double’ position (Never set Ion beam modulator at ‘OFF’ position while using Duo Post.)
- Open ‘flow control’ switch on ion gun gas.
- Ajust polishing angle of the guns at both sides (the thicker slice, the larger polishing angle); A positive angle gun and a negtive angle gun can be combined together to polish both sides of slice( the gun of Post can only adopt positive polishing angle );
- Set rotation speed, generally around ‘3’ ( Attention: If the speed is set at ‘0’, Duo Post cannot be lifted up. Don’t press ‘Vent’, in case of Pump broken);
- After setting Timer, press ‘Start’ to operate;
- In the process of polishing, adjust the binocular stereo microscope over the chamber, open the metal shutter, and turn on the top lamp or penetration lamp at the bottom to observe the thickness of polishing area (After observation, close the shutter to avoid the contamination and erosion of the sample chamber glass);
- After polishing, turn off ‘flow control’ switch, and make sure ‘rotation’ is not at ‘zero’;
- Press ‘Air Lock Control’ to lift up the slice till the Airlock lifts up entirely; and then press ‘Vent’ to exchange sample.
Attention:
In the process of lifting up, press ‘Vent’ would damage vacuum system and even lead to molecular pump break down.
- Daily Shutdown: No need to shut down the machine after use at ordinary times.
- Power off and shut down.
- Make sure the Ar gas cylinder is securely fastened.
- Power off PIPS
- Power on and operate the machine
- Open Ar gas cylinder
- Power on PIPS
- Use gun purging to purge sample surface gas (esp. PIG) to avoid instability of gun caused by outgassing. When the pressure in chamber is lower than 5×10⁻³Pa, open two gas-valve switches to purge for around 15minutes (if the vacuum state is damaged and needs to be repaired, the purging time would be 30~60 min); stop the purging when the gun current is 5KeV and lower than 8μA.
- Never operate normally until the vacuum degree comes to 5×10⁻⁴Pa (here, the vacuum degree is under the state of Ar gas cylinder off and Airlock at the top)
- After the ion gun removed and installed again, gun alignment is needed( adjust the flow rate and beam position)
Adjust gas flow rate: Put nothing on the specimen holder, set the gun angle at 0 degree, and set Ion beam modulator ‘OFF’; lower down Airlock and open the flow control switch of the left gun; press ‘Start’ to turn the gas flow knob to maximum value of gun current and enlarge the gas flow to lower the gun current value to be 85~90% of its original value. Close the left gun switch and then open the right gun switch. Complete adjustment of right gun according to adjustment method above.
Beam alignment adjustment: Place the fluorescent holder inside the chamber, open high voltage, and open gas. Adjust gun angle to +10 degrees, and observe fluorescence image gun around. Adjust the two small screws on the ion gun to make ion beam cross in the center of the black dot and the center position of the brightest region in the center of the black dot.