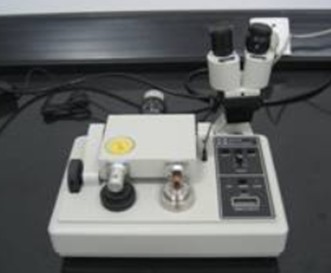
Ultra-Precision Dimpling Grinder
Name: Ultra-Precision Dimpling Grinder 656
Manufacturer:U.S. GATAN Company
Purchasing date: April 4, 2008
Main Specifications:
1. Control accuracy: 1μm
2. Grinding load: 0 ~ 40g
3. Able to read the sample thickness in real time.
4. Equipped with a stereo microscope, it has the function of accurate positioning and surface observation.
Person in charge of the equipment: Zhang Weina
Ways of contact:
Tel: 13604028597 024-83686411
E-mail:
Location: Room 101, RAL
Operation Rules
I. Sample positioning
- Put the sample fixed stage (as well as the centering ring) onto the magnetic turntable.
- Gently put the microscope on the fixed holder
- Insert the microscope attaching plug into the light socket. Adjust the height of the microscope eyepiece to focus on the sample surface.
- Adjust the position of sample stage (as well as the centering ring) till the sample area to be dented coincides with the crosshairs.
- Start the motor, and check the alignment. The sample area to be dented should rotate around the crosshairs. Remove the microscope after operation.
II.Grinding dent sample
- Put 20g load on the counterweight, and choose the second or the third grinding speed.
- Turn the micron-process driver clockwise to lower the subface of micrometer.
- Put the sample fixed stage without sample (as well as the centering ring) onto the magnetic turntable. Lower down the grinding wheel to the sample stage carefully.
Note: If the micron-process driver doesn’t lower down the subface of micrometer, the impact force from the lowering of stage may offset the zero position of the dial. If it is the case, readjust the zero position.
- Turn micron-process driver counterclockwise to raise the subface of micrometer, till the indicator needle rotates a full circle and stops just at the zero position.
Note: Keep the indicator needle just stopping at the zero position. Be careful not to exceed the zero position, otherwise the measurement data are not accurate.
- Press the ZERO button to clear and make a dent, the depth of which would be shown on the device.
- Use the cam carefully to raise the stage, and move the sample stage to make the glazing wheel on the surface of the sample. The dial indicator shows the aggregate thickness of sample and fixed tax at the same time.
- Turn the micro-process counterclockwise to raise it, till the figure shown on the digital display reaches the required thickness of the sample.
- Use a toothpick to get a small amount of diamond polishing paste onto the grinding wheel and sample, and then add some water for lubrication.
- Open two motors at the same time. (Press Table & Arm button)
10.Start automatic stop device (press AUTO button)
11.When the needle of the dial indicator turn clockwise and comes to Zero position, the automatic stop device would switch off motors of the turntable and grinding wheel.
III. Polishing
- Remove the grinding wheel, and wipe axles and grinding wheel with lens paper.
If the stain is difficult to remove, dip lens paper a little water or solvent (such as alcohol or acetone) to wipe.
- Completely remove residual grinding paste on sample.
Clean with a cotton swab dipped in distilled water, and then clean with acetone.
- Install the polishing wheel to the axle carefully.
- Put on 30g load, and adjust wheel speed to fifth or sixth gear.
- Smear 0.05μm alumina polishing paste on the polishing felt wheel and sample.
Note: Be careful not to smear the felt polishing rings. Don’t apply different polishing paste on a felt polishing ring.
- Carefully put the polishing wheel on the sample surface. Stop polishing until its surface equality is improved (It takes several minutes).
Note: Soft felt polishing wheel may lead to inaccurate measurement. Always observe polishing process through stereo microscope. The time required for sample polishing depends on the hardness of different samples.
IV. Take down the sample
- Remove the sample fixed stage from the magnetic turntable.
- Put the sample fixed stage on a 130℃ hot stage.
- Melt the paraffin completely, and use the small tweezers to take the sample down from the fixed stage (gently push it).
- Remove residual paraffin from the sample. Immerse the sample in acetone and wash it repeatedly till the paraffin is removed completely.
Note: If the sample is brittle, it’s better to put sample and sample stage together into acetone for the sufficient solution. After completion of solution, take out the sample in order to avoid damage of central thin area while heating to melt paraffin.