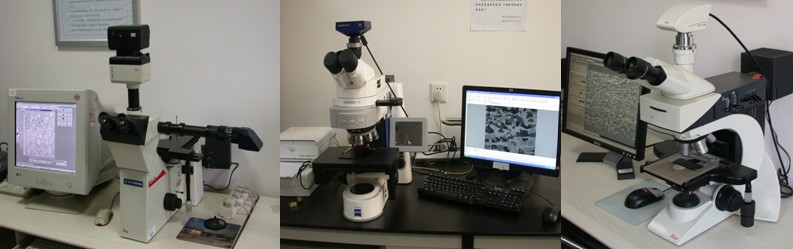
Name: Image-Analysis Metallurgical Microscope
Manufacturer: Leica Instrument Company, Germany
Main Technological Indicators:
- Eyepiece multiples: 10 ×
- Objective multiple: 2.5 ×, 5 ×, 10 ×, 20 ×, 50 ×, 100 ×
- Intermediate magnification changer: 1 ×, 1.5 ×
- Macro control: 1 ~ 11 ×
- Features: bright field, dark field, polarized light, differential interference
- Image processing: Equipped with Q550IW image analyzer, it can process and analyze images.
Common accessories:
- 135 film photography
- Large-version digital photography
Main application areas: Widely used in inspection and scientific research in the field of metallographic and petrographic crystals.
Main functions: Mainly used to identify and analyze the internal structure of the metal organization. It is an important instrument for metal metallurgical studies, and critical equipment for the industrial sectors to identify product quality. Equipped with an imaging device, it can shoot microstructure map, measure and analyze the map, and has functions like image editing, output, storage, and management.
Related Links:
Leica Instrument Company, Germany http://www.leica-microsystems.com/company/
Person in charge of the equipment: Xue Wenbin
Placed Location: Room 136, RAL
Ways of contact: Tel:83686420
E-mail:
Technological (Safety) Operation Rules
1. The equipment must be charged by specially assigned people. Without permission, no one could operate it.
2. Dirty sample is not allowed to be put on X-Y stage. All of the operations must follow its operation rules.
3. Connect the power, bulbs and power indicator will be lighted.
4. Put metallurgical sample on the X-Y stage. Adjust Coarse / Fine knob to focus, until the image can be observed clearly. During adjustment, always keep the objective lens from touching the sample grinding surface.
5. Select the appropriate lens multiples, adjust screw (rough to fine) to focus and choose proper brightness.
6. Open the optical path switching lever on the right side of the device, which can acquire and analyze images.
7. Be careful when holding lenses. Never touch lens surface.
8. After experiment, objective lens should be lowered down. Turn its brightness to minimum, and then cut off the power supply.
9. Clean up and cover dust cover.